August 14, 2018
Progressive Web App(PWA) is a term that has been thrown around quite a lot lately. But what exactly is a PWA? And how do we update our plain old website to be a cool hip PWA? Together we will explore how we can go from our current website to a full-fledged PWA. We will learn a thing or two about service workers, the offline web, and cross-browser compatibility.
Google has a big list of requirements of what a baseline PWA is, which we will go over one by one, and find out what we need to do to check it off our list.
Site is served over HTTPS
Why Migrate to HTTPS?
Because it’s 2018 and you really should just do it!
– Scott Helme
Even my development virtual machine has a certificate. Services like Let’s Encrypt, have made setting up https a piece of cake. And it’s only going to be more needed from here on out. Even if you don’t care about the security, all the cool new powerful toys (like service workers) need https to work.
Once you set up your website to be able to serve over https, the next step is to redirect all traffic to https. Adding the next snippet to your .htaccess (if you use apache) should do the trick, even if your website itself is behind load balancers. Be sure to test this on a staging environment, as these kind of things may work just a bit different when things like load balancers are in front of your web page.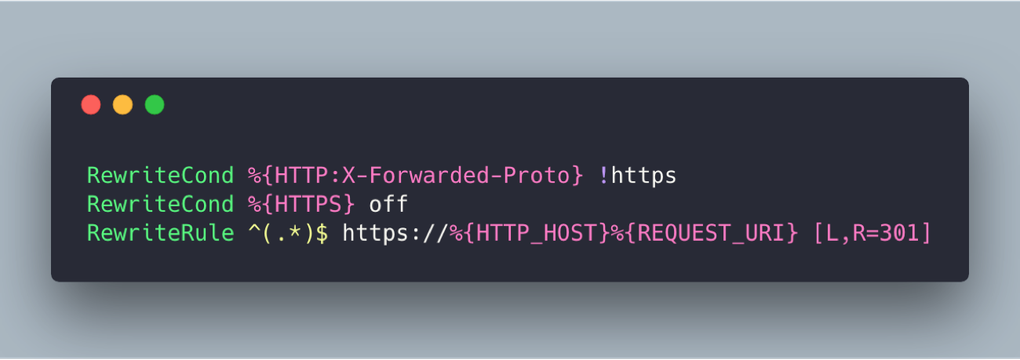
While we are doing this, its a good a time as any to look at all the links we have on the website, and make sure they all link to https:// instead of http://, for websites that allow an https connection.
Pages are responsive on tablets & mobile devices
We live in a mobile age, and chances are that a lot of people will visit your website from a phone or a tablet. Just serving the same website, but slightly smaller, won’t cut it anymore.
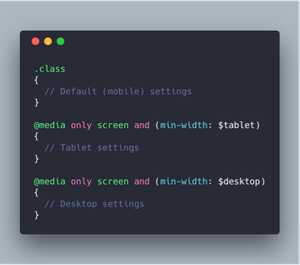
Your CSS may already look something like this. But why not go further and add breakpoints before tablet, you may want to display content differently if the user has a slightly larger than usual phone, but not a tablet. And if your audience uses their TV to look at your website, why not add a layout for that as well? If you are wondering how many breakpoints you should set, the answer is simple, as many as you need. If it makes sense to display content differently after a certain width, add a new breakpoint that applies those changes.
Because we are using min-width, anything that isn’t changed is inherited from the smaller size. So we don’t have to duplicate our CSS for every breakpoint. Instead, we simply apply the changes that are relevant to this screen size.
There is a difference between responsive and mobile friendly. Simply scaling the content down, and moving the images above or below the text instead of next to it is already mobile friendly. Responsive means that the mobile website was designed specifically for mobile. It means hiding content that isn’t relevant, and changing the way navigation works just for mobile. Attributes like ‘srcset’ and ‘sizes’ can help us to optimize for mobile even more. Because why would we load in a 1920x1080 background image when the page we are displaying on is closer to 360x640.
All app URLs load while offline
Offline web is a game changer. Why would you need an internet connection to visit the same static page that you visited just 5 seconds ago. To fix this, we have service workers, who can intercept all requests the website makes. They work even when you can’t make a connection to the server, and do things while offline.
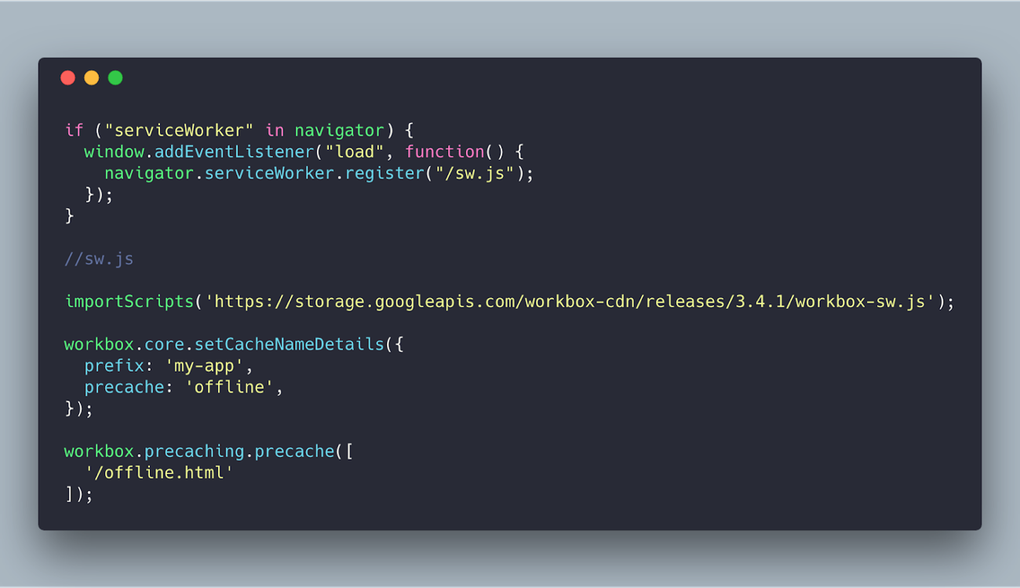
Using a tool like workbox makes setting up the caching a piece of cake. We register the service worker if it is possible in the browser. Workbox then handles the installation steps and will make sure to cache the ‘offline.html’ page when the user visits the website. Meaning that it will always be available, as soon as the user has been to the website.
Let’s serve all js, CSS, fonts, and images from cache where possible. Generally, these files won’t change, as new js and CSS files would contain a hash in their names. We register a new route on the workbox, and use a regex to find our images, js etc. We give it a new name to help keep it separated from more ‘dynamic’ content. Workbox provides us with plugins for specific settings, like the cache in this example. As the name indicates, the cacheFirst strategy will serve from cache if available or request one from the network if it hasn’t yet been cached.
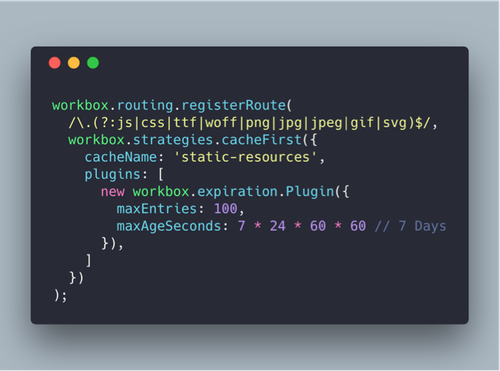
If the images you have can be uploaded by users, make sure to be case insensitive. Figuring out why two images aren’t showing up, only to find out they are named .PNG instead of .png isn’t the greatest way to spend an afternoon. The maximum amount of entries and the time you wish to cache them highly depends on what your website is doing. If your website changes images every day you can consider giving them a lower max age.
Even if being able to serve offline content isn’t a priority, adding this caching layer could drastically reduce the amount of data the user is using to visit your website.
Now let’s serve the rest of the website even while offline. We use the staleWhileRevalidate strategy in this example, which will show a cached version of the page if available, and then update the cache with the latest version from the network. If it is important that your users always see the latest version you can also use the networkFirst strategy. Our offlinePageFallbackHandler will serve the response it gets, or the offline page if it can’t get a response. This means that even if the server goes down, or if the user is offline, the website will still function for all pages that have already been visited, or return a ‘you are offline’ page if it doesn’t have a cached version, except for any /admin or /user pages.
If your web page can’t make a connection, inform your users about this. Endlessly refreshing a page, when you know something should have changed, only to notice that you don’t have a connection isn’t a great experience. A simple small box on the bottom of the screen stating “You are currently offline” is more than enough.
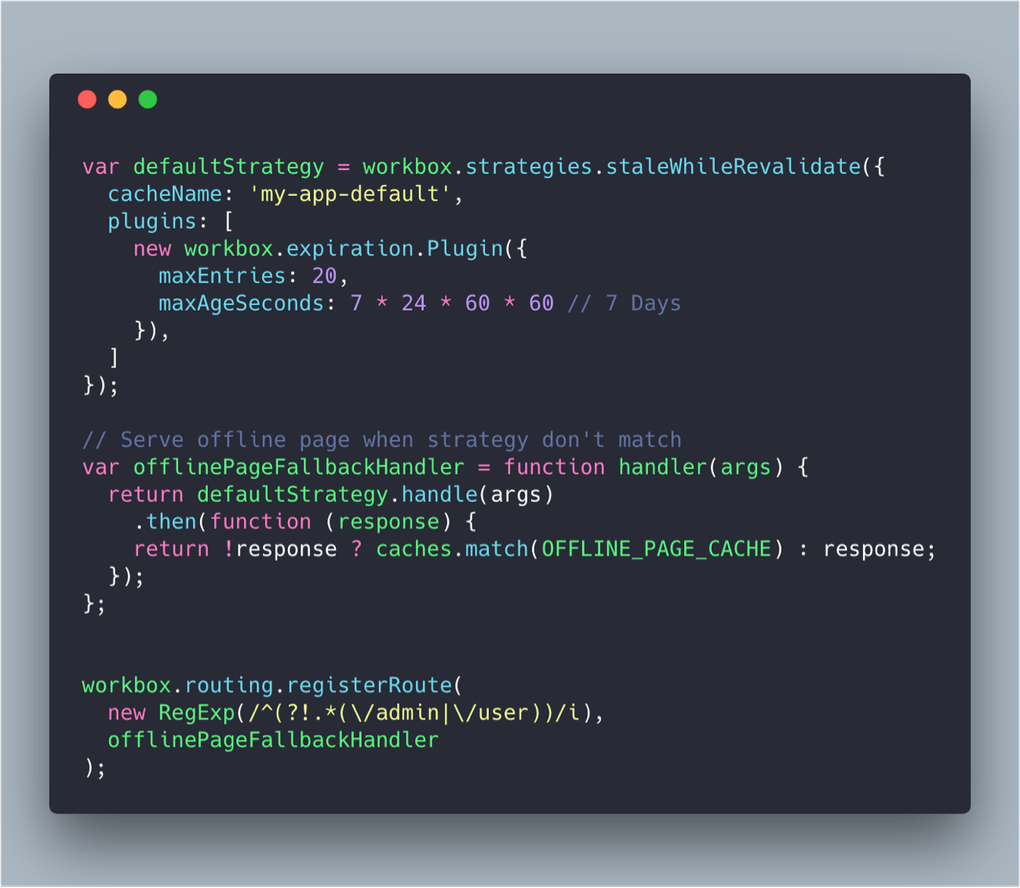
There are only two hard things in Computer Science: cache invalidation and naming things. -- Phil Karlton
The service worker adds a new layer of caching to your application, which can lead to unexpected results. The serviceworker will ignore caching headers and decide its own expiration, meaning that cache invalidation becomes even more of a problem. Be sure to test this on a staging environment where you can freely change content, and see that you are indeed getting new results as expected.
First load fast even on 3G & Page transitions don’t feel like they block on the network
Sure we can show pages while we are offline, but what about when we are online? A user doesn’t want to see a white screen for 5 seconds the first time they come to your website. Even just seeing the background change to a new color lets the user know something is happening. Consider displaying a website skeleton which loads extremely fast, while loading in the rest of the content dynamically. And of course, serve from cache if available, and update as needed.
Moving from page A to page B should be done instantly if I have already seen page B before. While i’m on page B it should then update the content when it loads. This may be nearly impossible for older websites that use a lot of ‘clever’ hacks to work around limitations of the time it was built, but for modern websites, this should be the standard.
Metadata provided for Add to Home screen
Installing a website as an app to your home screen really puts the App in the Progressive Web App. Chrome will ask users if they want to add the website to their home screen if they meet certain criteria. Although the exact way this works is changing, it will still be beneficial to meet these criteria.
If you already have a registered service worker, then meeting the rest of the criteria is just filling in a few details in your manifest.json file. The following keys need to be present:
- “name” or “short_name”: the (default) name of the website when it is added to the home screen.
- “icons”: the icon for the home screen, where a 192px and 512px version must be available.
- “start_url”: the URL which to point to when the ‘app’ is opened.
- “display”: determines how to display your ‘app’
The manifest.json allows for a lot more settings of your website, such as “orientation” which allows you to enforce either a portrait or landscape orientation. This is especially useful if you create a game. Or the “theme_color” key, which controls the color of the toolbar and task switcher.
The icons will also be used for the splash screen that opens when loading the website, therefore it is useful to set more than just the minimum 192px and 512px. This will give users with more unusual screen sizes a better experience.
Site works cross-browser
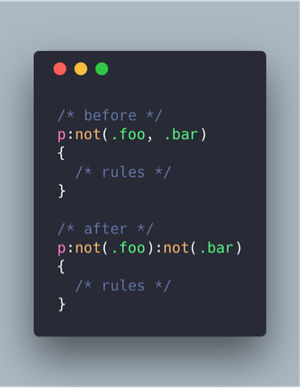
Most developers seem to be using chrome these days. Which means our website looks great (or good enough) in chrome, but everything is somewhat broken everywhere else. A tool like browserstack is great for checking if everything looks good with different browsers or operating systems.
With a tool like Webpack, we can transpile our javascript and CSS into something older/other browsers can use. Babel will allow us to write es6 code and turn it into older javascript code, and polyfill things that cannot be transpiled, and PostCSS does the same for our CSS.
For example, we can use the new :not() CSS notation, and it will turn into the version that works for all browsers. Or we can use arrow functions, that will turn into regular functions This means that a lot of new functionality and syntactic sugar can be used, while still supporting as many browsers as possible. The days of the CSS star hack are long gone. Instead, these new tools will make sure that our CSS and JS works in all the browsers we want, without having to write all the specific rules ourselves.
Each page has a URL
Not too long ago I was browsing hotels for a holiday. I found one that looked pretty good, but when I messaged someone the link, their response was just a question mark. The link in the address bar did not match with the page I was on, and just direct back to the homepage.
If your website builds itself with a lot of ajax calls or does not update the URLs for another reason this can be an issue. Thankfully there is the History API, which allows us to make sure we update the URL to match what we are doing. This also allows the back button to work with ajax calls etc. Functions like pushState will allow you to update the current URL to the one that actually matches the content, and with some event listeners we can make sure that the back button functions as expected.
In conclusion
If you looked at the PWA checklist you may have noticed there are lot more things to add, from the Exemplary list, like push notifications, and social media integration. I would consider those an accessory, which may not fit ever use case, while the ones in this list are always relevant.
Some of the items on this list have been around for many years, while others are relatively new. Whether you want to create a PWA or not, if you are building a website, every item on this list is something you should highly consider. Because in the end, it is about user experience. Your website should be easy to use, no matter your location, browser, or connection.